Nudo de corbata – 9 tutoriales en imagenes detalladas y videos
Nudo de corbata – 9 tutoriales en imágenes detalladas y videos
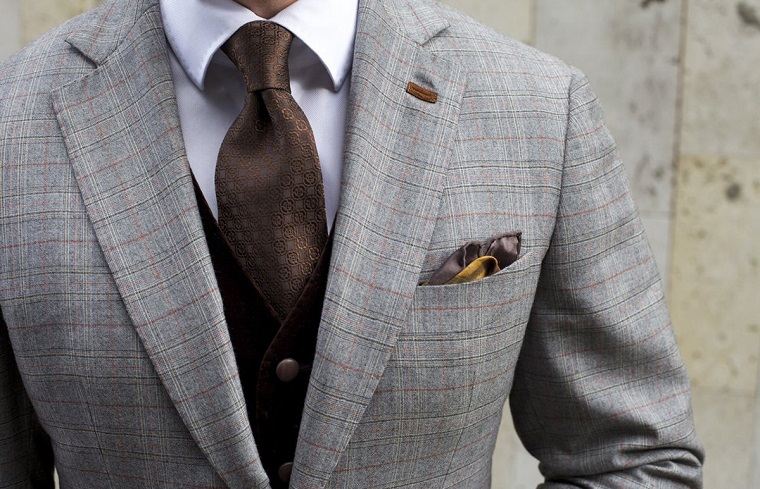
La corbata, ese accesorio icónico y elegante que complementa el atuendo de cualquier caballero, puede convertirse en un verdadero dolor de cabeza a la hora de hacer el nudo. Sin embargo, con los tutoriales adecuados, este proceso se vuelve mucho más sencillo y hasta divertido.
En este artículo, presentaremos nueve tutoriales en imágenes detalladas y videos que te guiarán paso a paso en la creación de diferentes nudos de corbata. ¡Prepárate para lucir impecable en cualquier ocasión!
1. Nudo simple: Este es el nudo más básico y versátil. Con solo tres movimientos, lograrás un aspecto elegante y pulcro. Nuestro tutorial te mostrará cómo hacerlo de manera clara y concisa.
2. Nudo doble: Si estás buscando un nudo más voluminoso y llamativo, el nudo doble es perfecto para ti. Con la ayuda de nuestras imágenes detalladas, aprenderás a dominar este estilo en poco tiempo.
3. Nudo Windsor: El nudo Windsor es conocido por su apariencia imponente y sofisticada. Aunque puede parecer complicado, nuestro tutorial en video te mostrará todos los pasos necesarios para lograrlo con facilidad.
4. Nudo Pratt: Este nudo es ideal para aquellos que buscan una apariencia elegante y simétrica sin tener que lidiar con movimientos complicados. Nuestro tutorial en imágenes te guiará para lograrlo de manera perfecta.
5. Nudo Eldredge: Si deseas impresionar con un nudo de corbata único y llamativo, el nudo Eldredge es la elección adecuada. No te preocupes por su complejidad, nuestro tutorial en video te mostrará cómo lograrlo paso a paso.
6. Nudo Trinity: Similar al nudo Eldredge en términos de complejidad y estética, el nudo Trinity es otro estilo que dejará a todos con la boca abierta. Nuestras imágenes detalladas te ayudarán a dominarlo sin problemas.
7. Nudo de pajarita: Para eventos formales o incluso para añadir un toque de estilo a tu atuendo diario, la pajarita es una excelente opción. Nuestro tutorial en video te enseñará cómo atarla de manera elegante y sin complicaciones.
8. Nudo de corbata para niños: No podemos olvidarnos de los más pequeños. En nuestro tutorial en imágenes, te mostraremos cómo hacer un nudo de corbata adecuado para los niños, para que puedan lucir tan elegantes como los adultos.
9. Nudo de corbata de lazo: Si buscas un estilo único y retro, el nudo de corbata de lazo te encantará. Aprende a atarlo como un profesional a través de nuestras imágenes detalladas y sorprende a todos con esta elección poco convencional.
En resumen, dominar el arte de atar una corbata ya no es un desafío gracias a estos nueve tutoriales en imágenes y videos. Ya sea que necesites un estilo clásico o uno más extravagante, encontrarás el tutorial adecuado para ti. ¡No dudes en ponerte manos a la obra y lucir tus corbatas con orgullo! Con estos tutoriales, podrás aprender a hacer nueve diferentes nudos de corbata, desde el nudo simple y el nudo doble, hasta el nudo Windsor, Pratt, Eldredge, Trinity, de pajarita, para niños y de lazo. Cada tutorial está disponible en imágenes detalladas y videos, lo que facilita aún más el aprendizaje. Ahora podrás lucir impecable en cualquier ocasión y añadir un toque de elegancia a tu atuendo. No te pierdas la oportunidad de dominar el arte de atar una corbata y sorprender a todos con tu estilo. Sigue estos tutoriales y ¡prepárate para lucir tus corbatas con orgullo! Los nueve tutoriales en imágenes detalladas y videos te guiarán paso a paso en la creación de diferentes nudos de corbata. Estos tutoriales te mostrarán cómo hacer nudos como el simple, doble, Windsor, Pratt, Eldredge, Trinity, de pajarita, para niños y de lazo. Cada tutorial está diseñado para que puedas dominar el arte de atar una corbata sin complicaciones y con facilidad. Ya sea que necesites un estilo clásico o uno más extravagante, encontrarás el tutorial adecuado para ti. No dudes en ponerte manos a la obra y lucir tus corbatas con orgullo. Con estos tutoriales, podrás agregar un toque de elegancia a tu atuendo y sorprender a todos con tu estilo impecable. ¡No te pierdas la oportunidad de convertirte en un experto en atar corbatas! En este artículo, se presentan nueve tutoriales en imágenes y videos que muestran paso a paso cómo hacer diferentes nudos de corbata. Desde el nudo simple y el nudo doble hasta el nudo Windsor, Pratt, Eldredge, Trinity, de pajarita, para niños y de lazo, cada tutorial está diseñado para ayudarte a dominar el arte de atar una corbata sin complicaciones y con facilidad.
Estos tutoriales te brindarán la oportunidad de lucir impecable en cualquier ocasión y añadir un toque de elegancia a tu atuendo. Ya sea que necesites un estilo clásico o uno más extravagante, encontrarás el tutorial adecuado para ti.
No dudes en poner en práctica estos tutoriales y lucir tus corbatas con orgullo. Con su ayuda, podrás convertirte en un experto en atar corbatas y sorprender a todos con tu estilo impecable. ¡No te pierdas la oportunidad de dominar el arte de atar una corbata y lucir tus corbatas con orgullo! Estos nueve tutoriales en imágenes detalladas y videos te guiarán paso a paso en la creación de diferentes nudos de corbata. Desde el nudo simple y el nudo doble hasta el nudo Windsor, Pratt, Eldredge, Trinity, de pajarita, para niños y de lazo, cada tutorial está diseñado para ayudarte a dominar el arte de atar una corbata sin complicaciones y con facilidad.
Con estos tutoriales, podrás lucir impecable en cualquier ocasión y añadir un toque de elegancia a tu atuendo. No dudes en poner en práctica estos tutoriales y lucir tus corbatas con orgullo. Con su ayuda, podrás convertirte en un experto en atar corbatas y sorprender a todos con tu estilo impecable. No te pierdas la oportunidad de dominar el arte de atar una corbata y lucir tus corbatas con orgullo. ¡No dudes en poner en práctica estos tutoriales y lucir tus corbatas con orgullo!
Are you in need of learning a quick and easy way to tie a tie? Or perhaps you’re interested in different types of knots to find ways to vary your look? Keep reading to learn more about the most elegant ways to wear a tie and tutorials to master them.
Tie knot ideas and tutorials
Today, we’re going to explain to you the different tie knots you can try to use to enhance your look. Specifically, we’ve selected 8 knots that vary in shape and difficulty level. To complete the collection, we’ll also show you how to tie a bowtie.
Below, you’ll find a tutorial for each of the tie knots in the photos. For those who prefer to see the instructions in video, we also have a small image for each of the knots. We’ll also tell you the characteristics of each knot and our difficulty rating.

Here’s a list of the knots we’re sharing with you today:
The simple tie knot, also known as the Oriental knot;
The Four in Hand tie knot;
The Windsor or Full Windsor tie knot;
The Half Windsor or Half Windsor tie knot;
The Pratt tie knot, also known as the Shelby knot;
The Kelvin tie knot;
The Balthus tie knot;
The Prince Albert tie knot;
How to tie a bowtie;

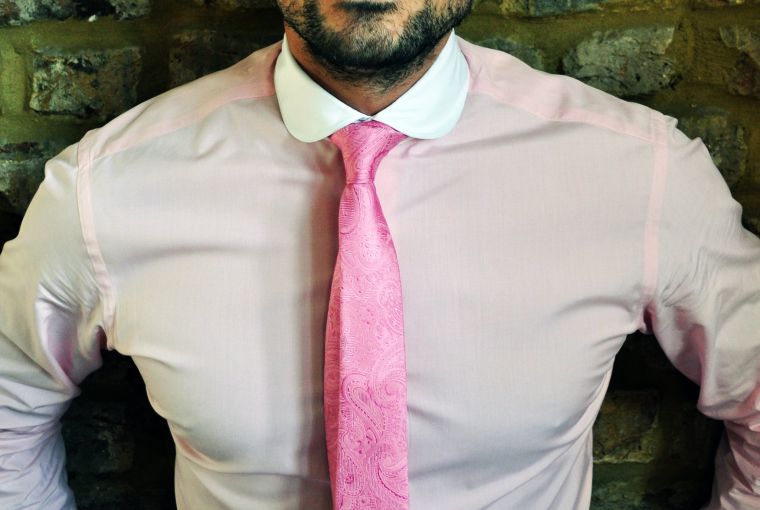
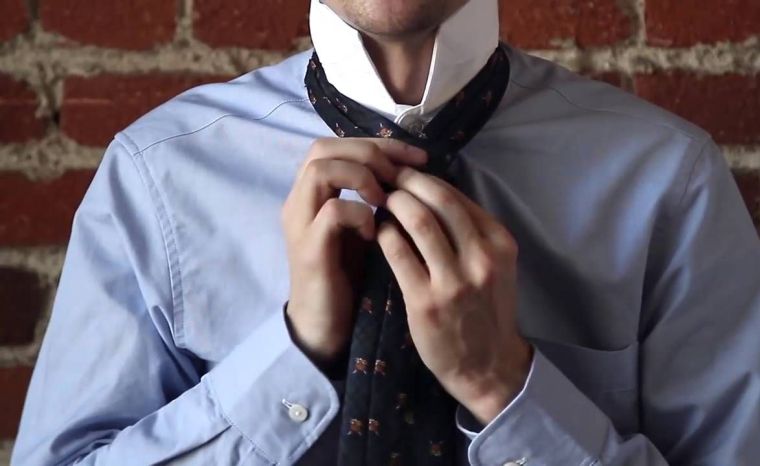
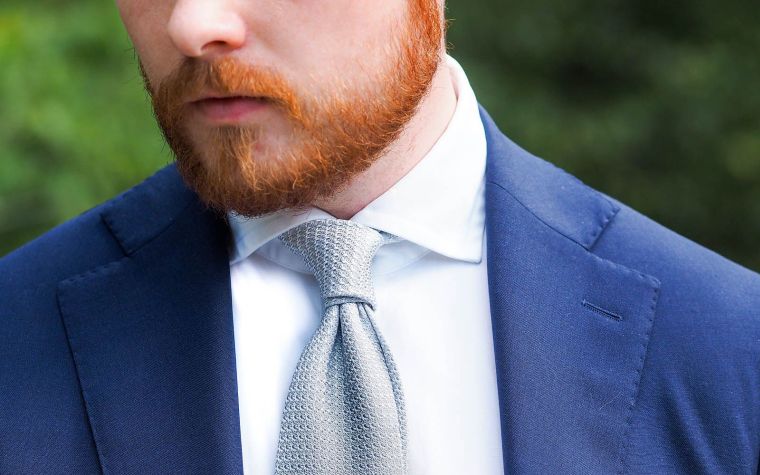
Simple tie knot
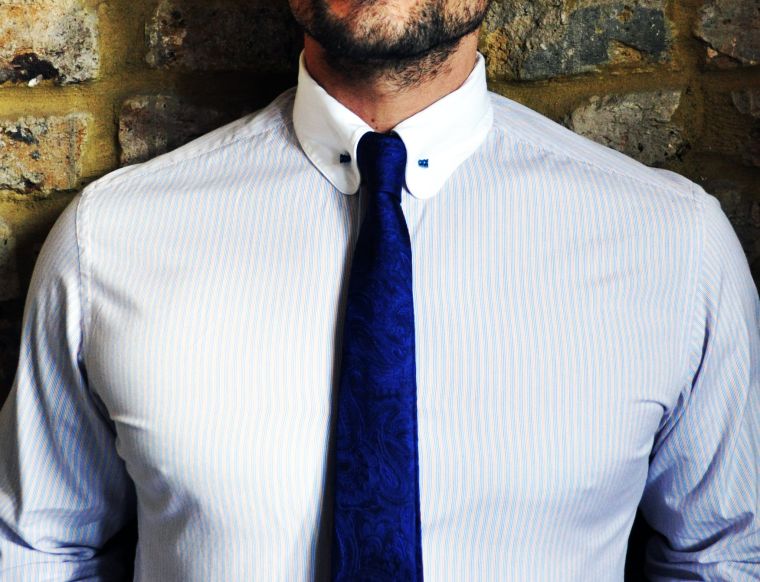
Our first idea is a simple knot. It’s also called the “Oriental” or “small knot”. It’s considered the easiest and quickest way to tie a tie because it’s done in just a few steps. As for the name “Oriental knot”, it’s because this way of wearing a tie is quite popular in Asian countries like China.
This type of knot will also appeal to those who like vintage style, the style of the 1940s. The downside is that it’s usually not used with a slim tie. If you like this type of tie, you should find another type of knot!
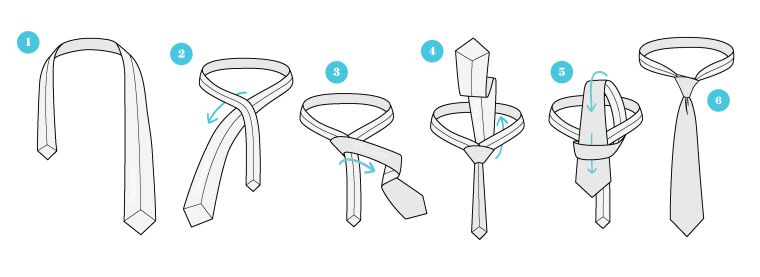
Simple tie knot in 6 steps
This simple knot is done in 6 consecutive steps. In the first image, you can see how to place your tie step by step and it shows how to design your big finish. As you can see, it won’t be very difficult for you to create this simple knot, but it will be very original and modern.
Here’s a tutorial of this simple knot in video:
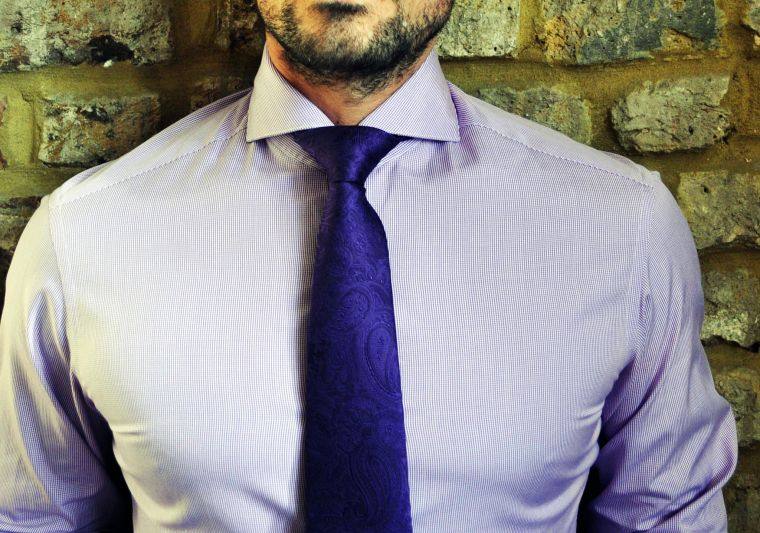
Four in Hand tie knot
Get ready to master the art of tying a tie with our guide to three classic knots. Whether you’re dressing up for a special occasion or heading to the office, these knots will add a touch of sophistication to your outfit. Let’s start with the Four in Hand knot, a timeless favorite.

The Four in Hand knot is simple, versatile, and easy to tie. It’s named after a popular club from the 19th century and has remained a go-to choice for many who prefer a single knot style. This knot creates a small to medium-sized asymmetrical knot that can be easily undone.
Not only is the Four in Hand knot elegant and refined, but it’s also incredibly functional. It pairs well with any suit and is suitable for both formal and professional settings.
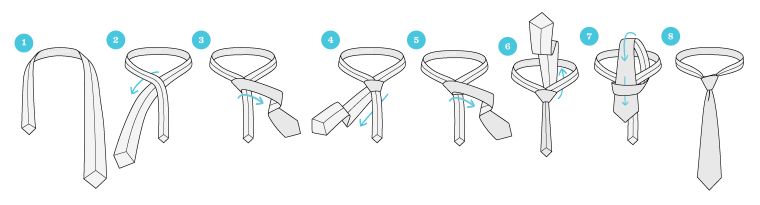
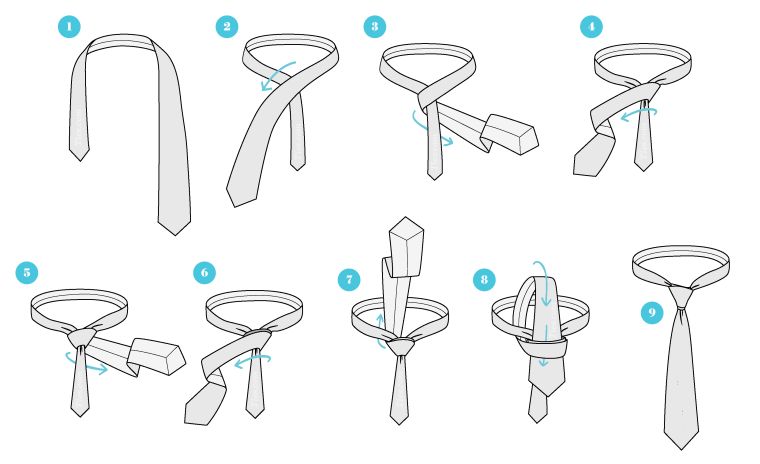
How to Tie a Four in Hand Knot
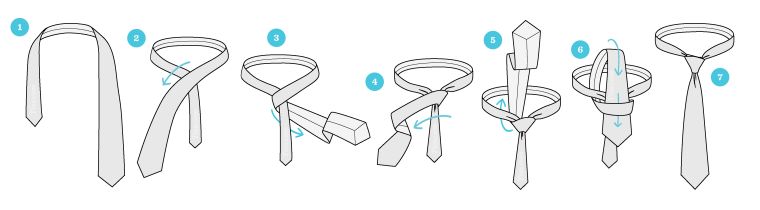
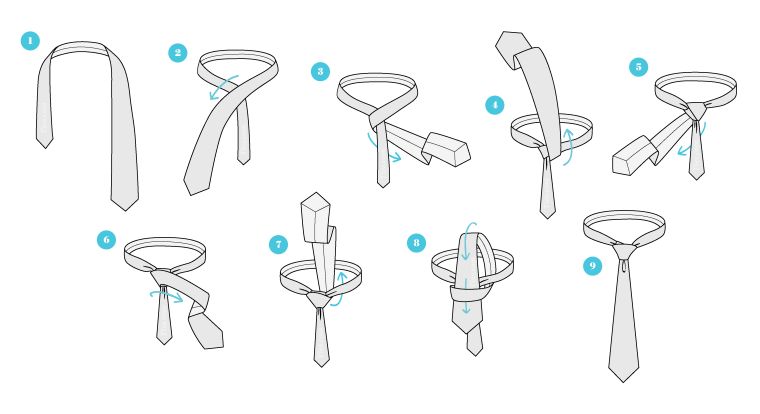
Follow these 7 simple steps to tie your tie using the Four in Hand knot. In image 1, you’ll see how to position the ends of the tie. Images 2 to 4 guide you through the initial steps before creating the knot. Images 5 and 6 demonstrate how to slide the wider end of the tie to tighten the knot. The final result is shown in image 7.
If you prefer a visual guide, check out this video tutorial on how to tie a Four in Hand knot.
The Windsor Knot: Classic Elegance
Named after the Duke of Windsor, this knot exudes classic elegance. Interestingly, the current Duke of Windsor prefers the Four in Hand knot, which suits his taste for thicker ties and wider triangular knots.
The Windsor knot is known for its symmetrical, triangular shape. Compared to other knots, it creates a larger knot. On a difficulty scale of 1 to 5, it’s rated as a 2.
How to Tie a Windsor Knot
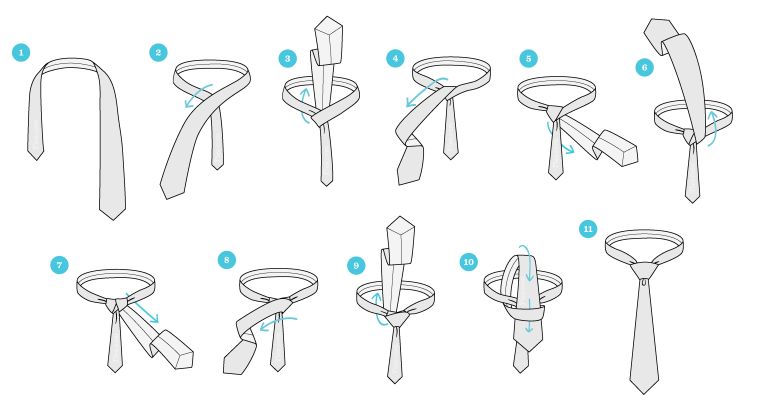
Mastering the Windsor knot requires patience and practice. Follow these 11 steps to achieve the perfect Windsor knot. Start by arranging the tie as shown in image 1. Then, repeat the gestures illustrated in images 3 to 6 to prepare for tying the knot. Continue with images 7 to 8, and you’re almost there! Finally, tie the knot as shown in images 9 and 10. The end result should resemble image 11.
If you prefer a video tutorial, check out this guide on how to tie a Windsor knot.
The Half Windsor Knot: Simple Elegance
After mastering the Windsor knot, let’s explore the Half Windsor or Semi Windsor knot. This knot is considered elegant and versatile, but it’s important to note that it’s not the same as the Full Windsor knot.

Half Windsor Knot
The Half Windsor knot is a medium-sized knot that looks symmetrical and stylish. When done correctly, it creates a bold and confident look. You can use it with medium and thin ties. On the difficulty scale, it’s rated 3 out of 5.
How to Tie a Half Windsor Knot
To create the Half Windsor knot, follow the tutorial shown in the photo above. Image #1 demonstrates how to position the tie initially. Continue with steps 2 to 4 to create a solid base for your Half Windsor knot. Then, just a few more steps and you’ll have a perfect Half Windsor knot. Check out Figure 9 for the final result.
If the photo tutorial doesn’t help, you can watch a video tutorial on how to tie the Half Windsor knot below.
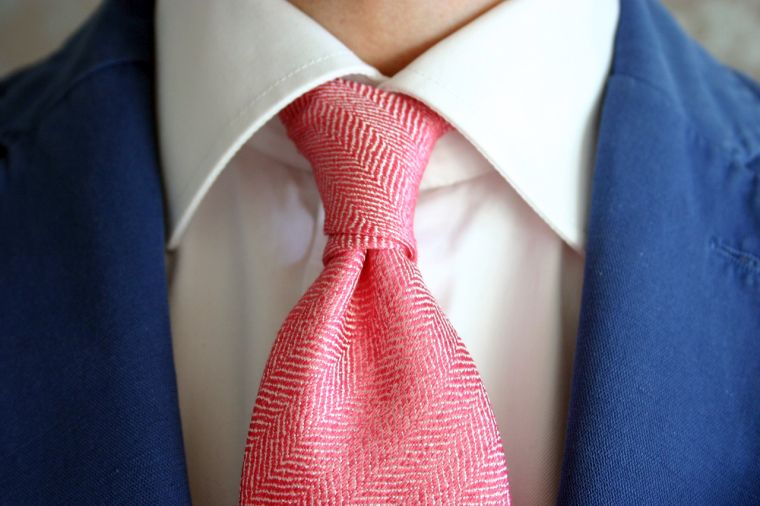
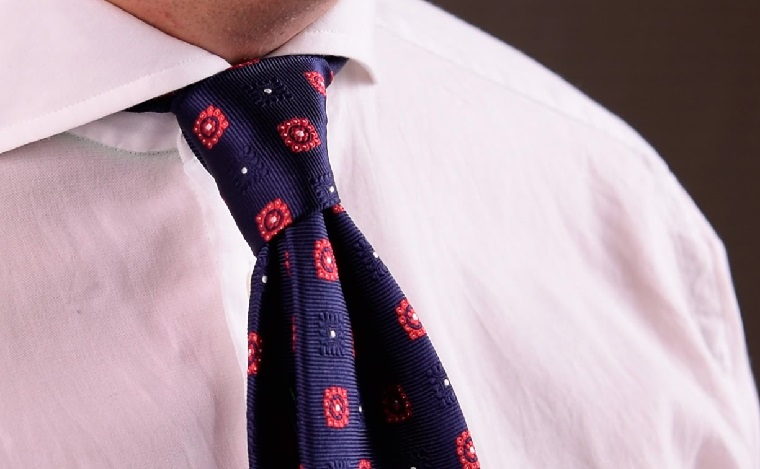
Pratt Knot

Let’s continue our tour in the world of tie knots with the Pratt knot. This knot is named after Jerry Pratt, who invented it. Jerry Pratt was a member of the US Chamber of Commerce. His invention gained fame on television in 1989. It was also when it was given the name Shelby knot, with images illustrating the proper gestures to recreate Pratt in newspapers.

The Pratt knot is a medium-sized knot that is symmetrical, just like the Four in Hand and Half Windsor knots. On the difficulty scale, it’s rated 3 out of 5.
How to Tie a Pratt Knot
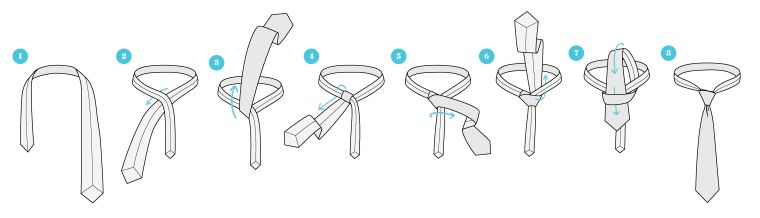
To achieve a Pratt knot, you’ll need to go through 8 consecutive steps. Start by positioning the tie as shown in Image #1. Then, follow steps 2 to 5 to create the base. The knot should be completed according to steps 6 to 7. Compare your Pratt knot with the desired result in Image #8.
If you prefer a video tutorial, you can watch the following one that will surely be helpful:
Kelvin Knot
Let’s move on to another unique knot idea and tutorial: the Kelvin knot. It is named after Lord Kelvin, a physicist and mathematician who lived during the 19th century and passed away in 1907. He invented the Kelvin knot by starting with the simple knot. Unlike the simple knot, the result is a knot similar to the Four in Hand but larger and with a more defined silhouette.
The Kelvin knot is a medium-sized knot that is quite symmetrical. On the difficulty scale, it’s rated 3 out of 5.
How to Tie a Kelvin Knot
The Kelvin knot is tied in 8 consecutive steps. To start, position the tie by copying Image #1. Then, for the basics, follow steps 2 to 5. The knot will be completed with steps 6 to 7. For the final result, closely examine Image #8.
If you prefer a video tutorial, you can watch the following one that will surely be helpful:
B Knot
Learn How to Tie the Balthus Knot

The Balthus knot is an elegant way to wear a tie. Created in 1930 by Balthasar Klossowski, the Franco-Polish artist, this knot allows you to achieve a much larger knot than the Windsor knot.
It is a very symmetrical knot, with a difficulty level of 4 out of 5. But don’t be discouraged! The complexity of this knot also adds to its importance. However, keep in mind that this knot will make the tie shorter due to the number of steps in the tutorial.
How to Tie a Balthus Knot
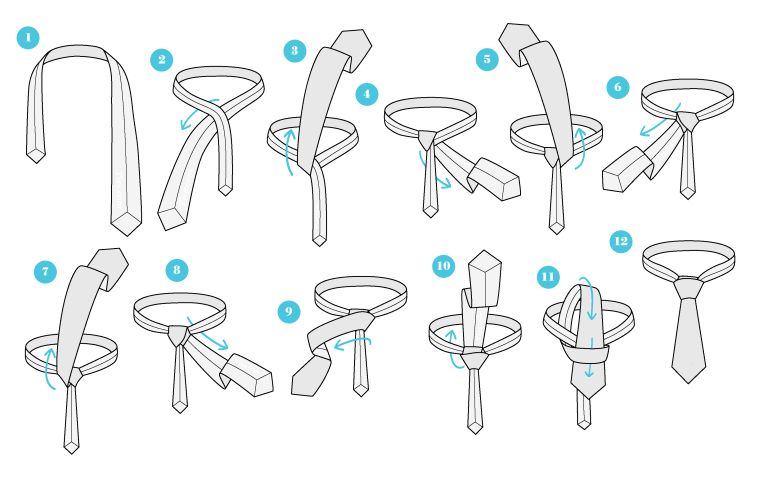
This tutorial consists of 12 consecutive steps. Start with image 1. Steps 2 to 9 will guide you through creating the base, and images 10 to 11 show the knot itself. For the final result, refer to illustration 12.
Watch the video tutorial below for detailed instructions on tying the Balthus knot:
Discover the Prince Albert Knot

Another interesting knot is the one named after Prince Albert, the husband of Queen Victoria of England. The Prince Albert knot is actually a variation of another knot named after the queen herself. This knot is slightly asymmetrical and larger than the Four in Hand knot. It should be worn to maintain an elegant and fabulous appearance.
The Prince Albert knot is of medium to large size. It is not the simplest knot to tie, so don’t expect to get it right on your first try. It has a difficulty rating of 3 out of 5.
Learn How to Tie a Prince Albert Knot
The Prince Albert knot can be tied in 9 consecutive steps. The starting position is illustrated in image 1. The steps to create the base are shown in images 2 to 6. Follow the instructions in images 7 and 8 for the knot itself. In image 9, you can see the final result.
Check out the video tutorial below for a visual guide on tying the Prince Albert knot:

Lastly, we also suggest learning how to tie a bow tie. Historically, there have been times when the bow tie was just as, if not more, popular than the necktie. This was the case in the 19th century, for example. The late 20th and early 21st centuries also saw a growing popularity of this type of knot. Additionally, it is a classic solution for very formal occasions. If you enjoy wearing classic ties, we also recommend taking a look at the tutorial below. It will be just as useful!
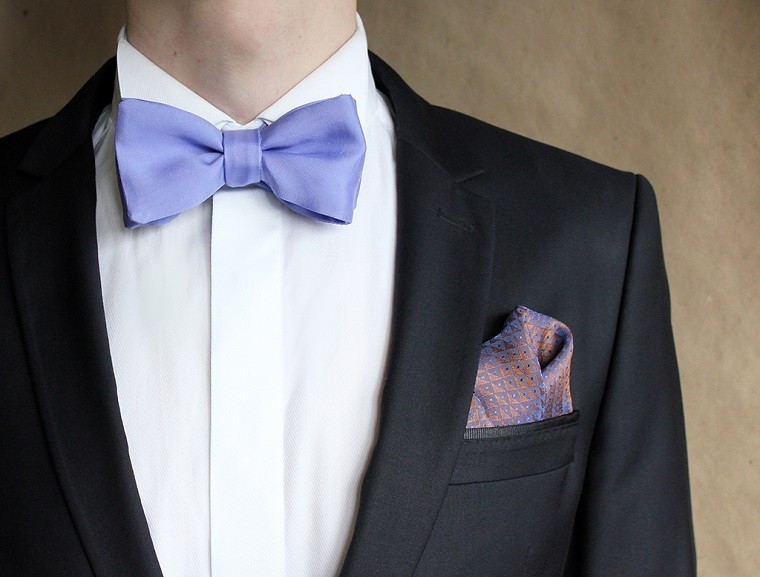
A properly tied bow tie should result in a very symmetrical look. In terms of difficulty, it is rated 4 out of 5. This means that the tutorial is quite challenging, and some practice may be needed to achieve the ideal result.
How to Tie a Bow Tie
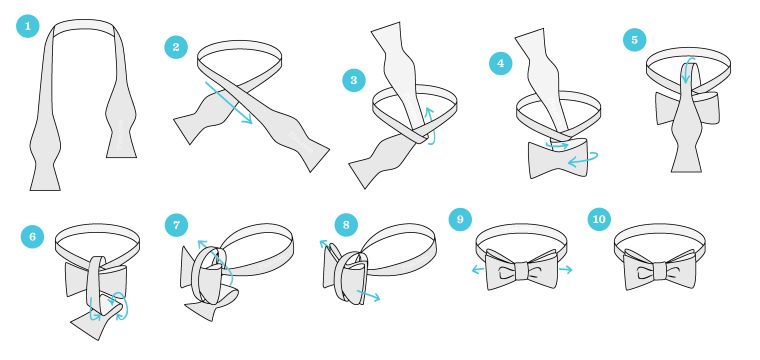
Get ready to learn how to tie a bow tie with our easy 10-step tutorial! Starting position is shown in image #1. Images 2 to 4 will guide you through creating the base. Once you’ve completed these steps, check out frames 5-8 for the actual knot. Remember to tighten it securely, as shown in step 9. For the final result, refer to #10.
If you prefer a video tutorial, you can watch the bow tie tutorial below: